Tuesday, May 11, 2010

EmulateIE7: make you site rendered like IE7 in IE8

Many times design of your site distorts in IE8. The instant solution to fix this issue is make your site rendered like in IE7 in Internet Explorer 8.0 also. Simply add following tagline inside head tag and make your webpage rendered like IE7 in IE8.

Note that, The X-UA-Compatible tag and header override any existing DOCTYPE. Also, the mode specified by the page takes precedent over the HTTP header.

Tag:

Wednesday, May 5, 2010

Firefox issue: Remove the dotted border around links

The default firefox issue when we use (hyperlink) for text, image or any other html element, it gives border around that element. Though its not a big issue, it looks weird sometime. This can be fixed using simple css formatting.

Use following syntax in css file, which will be applied for all default links.

a:active
{outline: none;}

a:focus
{-moz-outline-style: none;}


Thats it. Save the css file or the html page where you have embedded this code and see the results.

Monday, March 15, 2010

Removing Autorun.Inf is very easy

No need to have windows bootable cd and no need to in regedit everytime you have intorun.inf file in your harddrive. It is generic problem when we connect removable usb flash drives. It doesnt open by double clicking on the 'removable drive' icon in my computer.

I suggest you to install Editplus in your system. It can be found on internet in hardly few Kb's. After installing open it and select the removable disk drive from dropdown list appears at left hand side. It shows number of files contained in that drive. select Autorun.Inf and delete it. make sure you are deleting file not directory by right clicking on 'Autorun.Inf' and saying delete/remove the file.

That's it. now remove the flash/pen drive and reinsert. It will work. Some people suggest to insert xp cd and do lengthy steps or just deleting through command prompt using some cmd syntax. I found this easy method to remove Autorun.Inf file.

Wednesday, February 24, 2010

colorschemer: professional color matching website and application

Dear designer friends, See i'm sharing something for you. hope this will be helpful to you.

Here is the professional color matching website which would be helpful to you in choosing best color combination for your design. Try the given color combinations and design the web page, user interface or any kinda graphics.

Trust me, i tried many color combination and found it really helpful to me while working on web templates.

This site also providing one color matching application ' ColorSchemer Studi
o'. This application works with a dynamic visual color wheel, instantly explore harmony relationships and even let ColorSchemer Studio intelligently suggest color schemes for you! you can download this application for free on this website.

So what are you waiting for... try http://colorschemer.com/

Wednesday, February 17, 2010

Nokia phones secret codes

*#06# for checking the IMEI (International Mobile Equipment Identity).

*#7780# reset to factory settings.

*#67705646# This will clear the LCD display (operator logo).

*#0000# To view software version.

*#2820# Bluetooth device address.

*#746025625# Sim clock allowed status.

*#62209526# - Display the MAC address of the WLAN adapter. This is available only in the newer devices that support WLAN

#pw+1234567890+1# Shows if sim have restrictions.

*#92702689# - takes you to a secret menu where you may find some of the information below:
1. Displays Serial Number.
2. Displays the Month and Year of Manufacture
3. Displays (if there) the date where the phone was purchased (MMYY)
4. Displays the date of the last repair - if found (0000)
5. Shows life timer of phone (time passes since last start)


*#3370# - Enhanced Full Rate Codec (EFR) activation. Increase signal strength, better signal reception. It also help if u want to use GPRS and the service is not responding or too slow. Phone battery will drain faster though.

*#3370* - (EFR) deactivation. Phone will automatically restart. Increase battery life by 30% because phone receives less signal from network.

*#4720#
- Half Rate Codec activation

*#4720* - Half Rate Codec deactivation. The phone will automatically restart

If you forgot wallet code for Nokia S60 phone, use this code reset: *#7370925538#
Note, your data in the wallet will be erased. Phone will ask you the lock code. Default lock code is: 12345

Press *#3925538# to delete the contents and code of wallet.

Unlock service provider: Insert sim, turn phone on and press vol up-arrow keys) for 3 seconds, should say pin code. Press C, then press * message should flash, press * again and 04*pin*pin*pin#

*#7328748263373738# resets security code. Default security code is 12345
Tuesday, February 9, 2010

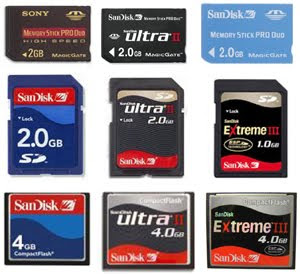
Memory card corrupted..Try this before buying new card..!!


Hey, your mmc got corrupted, going to buy a new one? Stop here and see it. you can try to repair it.

All the memory card are based on the FAT file system and not the FAT32 or NTFS file system. for repairing you will need a corrupted mmc, a mmc reader, and a PC, obviously.

1) Insert your card in the mmc reader.
2) Find the drive in which it is inserted from your pc.
3) Right click the selected drive and select FORMAT but NOT quick format.
4) Now, in the file system selection part, select the file system to be FAT and not FAT 32 or NTFS file system.
5) Start formatting.

You can also do this by using Windows Explorer. HAPPY FORMATTING!

Friday, February 5, 2010

Photo retouching using Photoshop: Its Simple..!!

Here are simple steps im usually following to retouch the photos. There might be some more easy and more effective ways that this. You can have your own procedure, but spend some time and try this too.

Here are the steps:
1. Take a photo you want to edit/retouch and Open in photoshop. Fig. below shows a photo im goin to edit (fig.1).
You can see the dark circles and marks on the face (fig 2).


2. Create a copy of the layer which will help you to compare retouched photo with old(existing) photo. Take one
more copy of the layer. (Now you have 2 layers with one Background layer.)

3. Now, use gaussian blur filer on the uppermost layer of the image. (amount of blur will varry depend on
photo's quality, light. Make sure that its not affecting the pixel value of image, and skin color tone is
easily visible.)
Note that, our eyes understands the difference with the blured edges of the characters or objects in the photo. Figure below is the same photo with gaussion blur.

Figure 3

4. Now, Use eraser tool (E) and remove the edges of the object (or body parts of the character) as shown in the following figure. Make sure to remove blured effect from lips, eyes, hairs, chin edges, neck edges and clothes for the character.

figure4

5. Now merge the upper layer with following layers (dont merge with background) .

6. adjust the light with Use the curves (ctrl+m) option. I suggest not to use brightness and contrast option as
it affects on whole image and degrade the quality.

That's it. See the the difference by hiding the merged layer. Now old image is there in background and the
layer is having retouched image.


Try this, it really works. These are simple steps to use and retouch the photo at home within a short time. There are other more effective but time consuming method.