
Here are the steps:
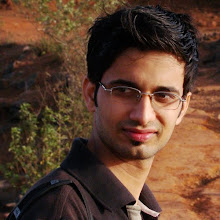
1. Take a photo you want to edit/retouch and Open in photoshop. Fig. below shows a photo im goin to edit (fig.1).
You can see the dark circles and marks on the face (fig 2).


2. Create a copy of the layer which will help you to compare retouched photo with old(existing) photo. Take one
more copy of the layer. (Now you have 2 layers with one Background layer.)
3. Now, use gaussian blur filer on the uppermost layer of the image. (amount of blur will varry depend on
photo's quality, light. Make sure that its not affecting the pixel value of image, and skin color tone is
easily visible.)
Note that, our eyes understands the difference with the blured edges of the characters or objects in the photo. Figure below is the same photo with gaussion blur.

Figure 3
4. Now, Use eraser tool (E) and remove the edges of the object (or body parts of the character) as shown in the following figure. Make sure to remove blured effect from lips, eyes, hairs, chin edges, neck edges and clothes for the character.

figure4
5. Now merge the upper layer with following layers (dont merge with background) .
6. adjust the light with Use the curves (ctrl+m) option. I suggest not to use brightness and contrast option as
it affects on whole image and degrade the quality.
That's it. See the the difference by hiding the merged layer. Now old image is there in background and the
layer is having retouched image.

Try this, it really works. These are simple steps to use and retouch the photo at home within a short time. There are other more effective but time consuming method.


No comments:
Post a Comment